
It is simply annoying when you go to safely remove hardware from your computer but the computer says it is still in use! What? You have finished transferring files to your USB drive and nothing seems to be open, but you still can’t safely remove hardware.
Hardware Device Still In Use Message Appears – Why?
There are many reasons why hardware can be still in use when you try to safely remove it from your computer. The reasons can be obvious and sometimes not so obvious. Here are a few examples of why your hardware could be still in use.
- You accessed a file from the drive and it is still open. For example you opened a photo from that device and you are still editing it in another program.
- You cut a file from the device and haven’t pasted it anywhere yet.
- You copied a file and haven’t pasted it yet.
- The drive has a large amount of files on it and is still being indexed by Windows. See how to disable indexing a drive in Windows.
- A Hard drive monitoring utility is still using the drive. For example a program that shows hard drive health might be checking the external hard drive and preventing you from removing safely.
- Files could be getting backed up to the drive by auto backup software.
- There could be a scheduled de-fragmentation in process.
- Your antivirus might be scanning the drive.
As you can see it is not always abvious that something is being used on your drive. Here are some easy tips to safely remove hardware when you are told that your drive is still in use.
#1. Safely Remove Hardware Device
First try to safely remove hardware the right way by accessing the icon in the right hand bottom corner (notification area).
Please note that the icon will only appear if you actually have some hardware connected to the computer.
As you can see in the screenshot below, I had to press the arrows to expand the icon area. That way I can see more icons to choose from. Then all I had to do was right click on the USB looking icon and choose eject from the tiny menu.
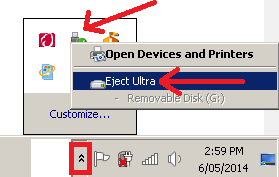
The little arrow icon that allows you to access the extra icons also shows in Windows 8 but just looks a bit different.
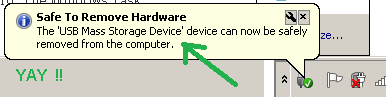
If the device is ready to be removed then you will see a balloon message saying that your device is ready.
You can use this safe to remove hardware feature for devices like a USB flash drive or an external hard drive. When you get a message saying that the device is busy and can’t be removed, then that is when you need to try the other options below.
#2. Close All Applications and Processes
This is simple. Just go and close any applications that are running as they might be still using a file from the hardware drive you are trying to safely remove. For example, you might have a photo open from the external hard drive, or maybe you decided to email a photo but have not sent it yet. The device holding the photo must be accessed to actually email the photo.
Sometimes when a file is being used it is not always obvious to the average user. There are also programs that crash like a video editing program that look like they are not running but are. If any footage came from the device you’re trying to remove then this will stop you from removing that device.
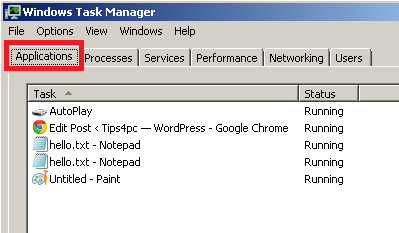
To find hidden programs that are still running simple go to the task manager by pressing CTRL ALT DEL on the keyboard. The Windows Task Manager will open. Go to the processes tab to see running processes and go to the applications tab to see files that are open.
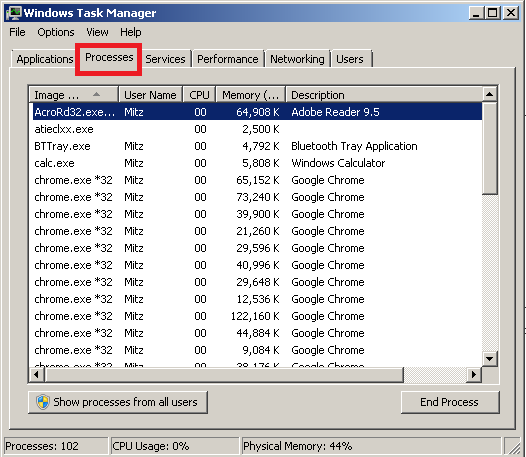
A friend of mine had a free program installed called Treesize which showed you in detail how much drive space you had. Unfortunately when he wanted to remove his USB device this small program was stopping him from doing so as it was still monitoring the drives. Each time he wanted to remove a device he had to go to task manager and find the FolderSizeSvc.exe process and end it. Only then could he remove his USB device safely.
You can also open Computer Management to investigate open files by following these steps:
1. When in computer management, expand system tools by pressing the plus sign next to it.
2. Click on shared folders.
3. Then choose open files to see what files are open. If you are sharing files over a network then someone else might be accessing a file.
#3. Investigate Devices That Are Plugged In
There are two good ways to see what devices are actually plugged into your computer.
The first way is to open the Safely Remove Hardware dialogue box where you can see a list of devices that are connected to the computer.
1. Hit the WIN KEY and the letter R on your keyboard to open the run box.
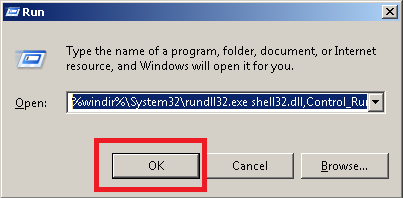
2. Paste in this command:
%windir%\System32\rundll32.exe shell32.dll,Control_RunDLL hotplug.dll
3. Press OK.
4. The Safely Remove Hardware dialogue box will appear.
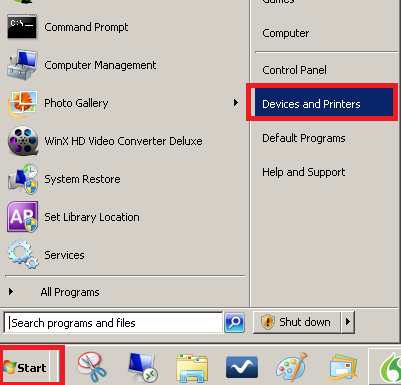
The second way is to go to the start menu and choose Devices and Printers from the menu.
#4. Turn Read/Write Cache Off
In theory, the modern Windows operating system do not need to use the safely remove hardware option. Apparently it has “Quick Removal” set as a default and is only changed if the user has accesses the properties and removes the default option. Some people change this setting and allow Read/Write caching for better performance, while others just want to enable Quick Removal.
Of course even if you disable read/write caching for the drive in question, you can still use the “safely remove hardware” option if you prefer. I definitely don’t take risks with important data so I do use the “safely remove hardware” tool as often as I can.
To change these settings and enable quick removal follow the instructions below:
1. Go to the start menu and choose computer from the menu.
2. Right-click on the USB you want to change settings for and choose Properties from the menu.
3. Go to the Hardware tab and select your USB device from the list by making it blue.
4. Then click on the properties button below.
5. Another dialogue box will open. On the general tab click on the change settings button.
6. Go to the policies tab and you will see two options there. Read them carefully and choose one that suits you best.
#5. Shut Down
When all else fails, shutting down your computer or laptop completely will most likely do the job. As the operating system will close down any open process and programs, nothing at all can then be still accessing the drive in question. This only works with a complete shut-down and not hibernation.
Many people find this annoying and a waste of time, but when all devices are powered down you can safely remove them from your computer. It is usually when people become impatient and pull out the device when it is in use that the problems begin.
No comments:
Post a Comment