
Follow these step-by-step instructions to help you get to know what your keyboard can do
So that you can carry out the simple exercises below, you’ll need a document open to type into. Read our guides What is WordPad? and How to open WordPad. Then create a WordPad document and go through the following steps.
Step 1: Have a good look at your keyboard. The most important keys are labelled on the diagram below:
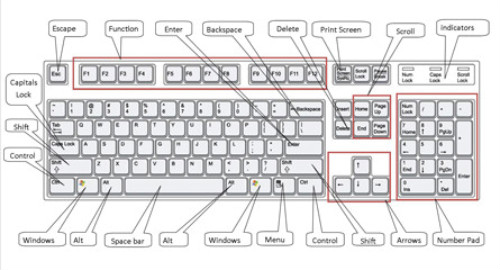
Some keyboards, especially those on laptops, will have a slightly different layout. For example, yours might not have a number pad or the delete key may be in a different place. But virtually all keyboards will have these important keys somewhere.
Step 2: The main keys are the letter keys. When you type just using these, you get lower-case print. However, if you hold down a ‘shift key’ (there are two to choose from) at the same time as you type, you’ll get UPPER-CASE letters. Try typing your name, including capitals (UPPER-CASE) and spaces. The ‘space bar’ (which you press briefly to make a space) is the wide key at the bottom of the keyboard.
Step 3: If you make a mistake in your typing, there’s always a remedy. To delete a letter, place your cursor (mouse pointer) just after the letter and click. Then press Backspace briefly. (Always press briefly – otherwise, you’ll get repeated deletions, spaces, letters or whatever.) Or place your cursor just before the letter, click and press Delete.
Step 4: Now try typing a sentence: This is a good sentence to practise because it contains most of the letters of the alphabet.
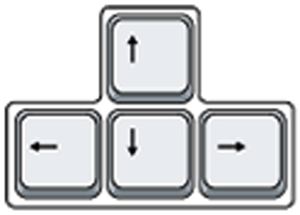
Step 5: You can move the cursor along this sentence without deleting anything by using the arrow keys: Try moving the cursor backwards and forwards through your sentence.
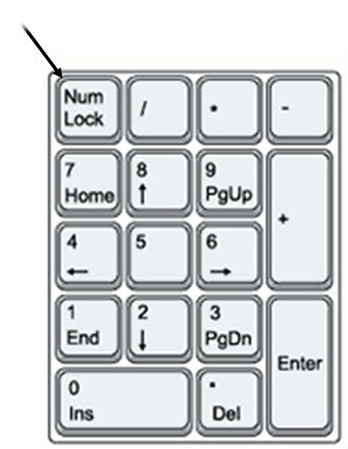
Step 6: Now try using the number pad, if you have one. To use this to type numbers, you have to press the Num Lock key. There may be an indicator light at the top of the keyboard or on the ‘Num Lock’ key itself to show that it’s on.
Step 7: You can also type using the numbers on the main keyboard. You’ll find them on the row of keys above the top line of letters. Above these numbers are various symbols, which include ‘£’, ‘&’, ‘!’. To use these, hold down the Shift key while you type. So if you press ’7′ on its own, you get ’7′, but if you press ’7′ while you hold down the ‘Shift’ key, you get ‘&’. Try typing:

You’ll find similar extra symbols elsewhere on the keyboard:
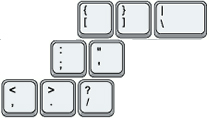
They operate in exactly the same way as the ones above the numbers.
Step 8: If you want everything to appear in upper case, press the Caps Lock key and then type:

Again, an indicator light may come on to show that your capitals are ‘locked’. Don’t forget to press this key again when you’re finished to turn ‘Caps Lock’ off.
Step 9: The ‘Windows’ key comes in a number of different designs, such as the
example to the right
It does exactly the same thing as the Windows button on the taskbar on your computer screen. You can choose to open the ‘Start’ menu by pressing this key or by clicking the button on the taskbar with your mouse.
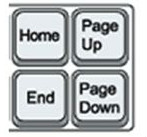
Step 10: There are a number of ways that you can move round a web page. Try using the keys below to see where they take you:
Step 10: You’ll be told to use the ‘Control’ (Ctrl) and ‘Alternate’ (Alt) keys for some operations. When you do so, keep holding down one or the other key or both keys while you press any other keys.
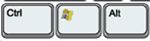
For example, if you press Ctrl, Alt and Delete all at the same time, a menu will open. To make it disappear, press the ‘Escape’ (Esc) key in the top left-hand corner of the keyboard.

Step 11: Some of the things that you use the mouse for can be done with keyboard shortcuts. These require you to hold down one key while pressing another, and often involve using the ‘Ctrl’ and/or ‘Alt’ keys. Some people prefer using them to using the mouse. There are many shortcuts – check out the list provided by Microsoft Support.
No comments:
Post a Comment